Running a relayer
The relayer can be run on a separate (smaller) machine than the validator, or co-hosted on the same machine. A few settings below are different for co-hosted vs. separate host setups.
Note: There is no reason to run a relayer unless you are connecting to a block-producing validator (on the leader schedule).
Preparation
The relayer needs to authenticate connections from validators. It accomplishes this through challenge/reponse system that creates authentication tokens signed by both the relayer and validator. The relayer uses a pair of JWT tokens that can be generated with the following commands:
Fill in OUTPUT_DIR with the path where you would like to store the tokens. You will need to supply this path in your relayer startup below.
The relayer also needs to be authenticated by the block engine. For this, you need to generate a solana keypair and open a ticket in the Jito Discord to get whitelisted to block engines:
RPC Server
The relayer needs access to an rpc to for a few reasons:
determine when to forward packets (leader schedule and slot)
keep track of account lookup tables for transaction forwarding
stake weighted QoS
VERY IMPORTANT RPC DIRECTIONS
Using a validator for your RPC server is strongly preferred
It's very important that your relayer is connected to RPCs that can keep up with the tip of the network. If the RPC you're using can't keep up with the tip of the network, your validator can produce small blocks.
If you do not have multiple, private RPCs that you can monitor, it's strongly recommended that you co-host your relayer with your validator and connect to your validator for websocket and RPC.
Running the Relayer
You need to either build or download the binary executable for the relayer. Instructions can be found in the relayer repository - https://github.com/jito-foundation/jito-relayer/tree/master.
We recommend running the relayer as a Systemd service. Two example systemd configuration files are shown below. Make sure to:
replace
PATH_TO_KEYSwith the ones you generated abovereplace the
USERwith your system user namesupply the
BLOCK_ENGINE_URLof your choice (See Third Party Block Engines)change
RELAYER_PATHto the path for your relayer executable and make sure that it has executable permissions
If you're running the separate host setup, you also need to supply rpc urls.
Note: You must set RUST_LOG=info in order to emit info level datapoints to the metrics server.
Co-Hosted Setup
For hosting your relayer on the same machine, please add the following commands to your solana-validator:
The following systemd file serves as an example starting point:
Separate Host Setup
Firewall Settings
You will need to open udp ports for tpu_quic_port and tpu_quic_forward_port on the relayer machine (default 11228 and 11229).
If you are running the relayer on a separate host, you will also need to open a tcp port for grpc_bind_port default (11226). This is not needed for the co-hosted setup.
(Nice to have): Time Synchronization
This is not required, but a nice to have. Please find an NTP server for your region here, and connect using an ntp client (we recommend chrony). An example chrony systemd service file and config are given below. There are numerous guides for running ntp clients (e.g. https://www.redhat.com/sysadmin/chrony-time-services-linux).
Monitoring
A public dashboard is available for viewing basic operational metrics for the relayer: https://grafana.metrics.jito.wtf:3000/
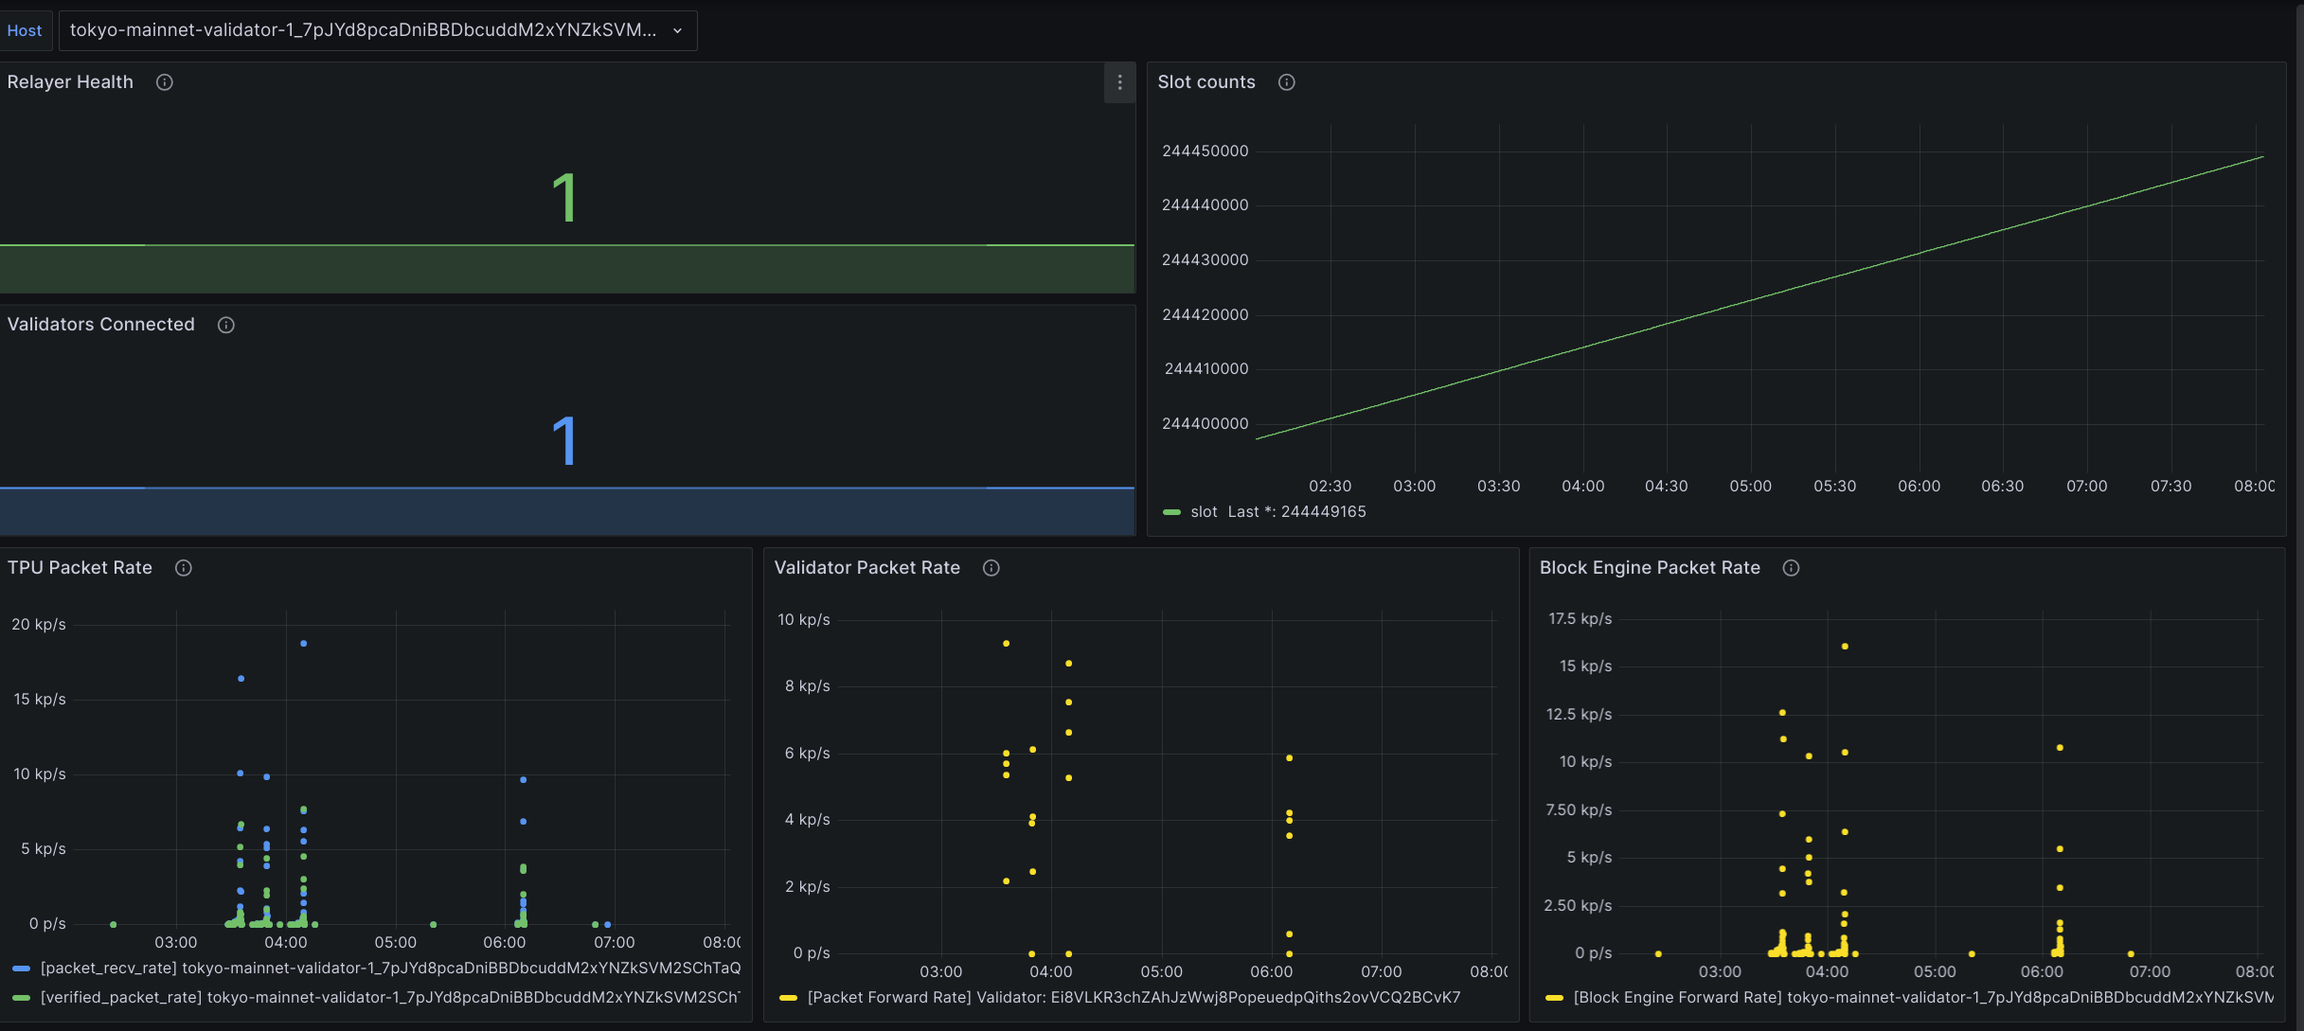
The relayer host name can be selected from the dropdown. The default host is Jito's co-hosted test setup and can be used as an example of what to expect for this configuration with a low staked validator.
Relayer health is used to determine if the relayer's view of the current slot is up to date (1 = Good, 0 = Bad).
The number of validators connected should be 1 for a co-hosted setup.
The slot count shows the most up to date slot the relayer has received.
TPU Packet Rate shows the rate (packets per second) of packets received and passing sigverify/
Validator Packet Rate shows the rate (packets per second) of packets being sent to each validator.
Block Engine Packet Rate shows the rate (packets per second) of packets being sent to the Block Engine.
Packet rates vary with time on the network, but they should be similar for validators with leader slots close in time.
Relayer Command Line Arguments
As seen in the systemd files above, the default values for most arguments should work for the majority of cases. However, the relayer is highly configurable based on individual nees. We have included descriptions of the most commonly configured arguments below. A full list of command line arguments can be found in the relayer source code (https://github.com/jito-foundation/jito-relayer/blob/master/transaction-relayer/src/main.rs)
Required arguments
block-engine-url: See Third Party Block Engines
keypair-path: The path to the keypair file used to authenticate with a block engine.
signing-key-pem-path: The private key used to sign tokens by this server.
verifying_key_pem_path: The public key used to verify tokens by this and other services.
Optional
rpc-servers: A space-separated list of RPC servers to connect to for network information. It's also reccomended that you run multiple RPC servers for redundancy purposes.
websocket-servers: A space-separted list of RPC servers to listen to for slot updates. Must be a 1:1 mapping in ordering as the rpc-servers command line argument.
grpc-bind-ip: Bind IP address for GRPC server that listens for validator connections.
public-ip: The public-facing IP of the relayer server. This is advertised on gossip as the place to send transactions to, and needs to be an ip that is routed the machine where the relayer is running. This is provided for situations where looking up the public ip through (ifconfig.me) is not possible.
allowed-validators: An allow-list for validators to connect to the relayer. If not specified, then any relayer on the leader schedule is allowed to connect.
Last updated